iPhoneography Apps: iColorama Masking 2022

The Brush Mask Toolbar in iColorama has been changed to eliminate the text labels. Also, some additional AI masking has been added to help build masks. This video should help you identify the available tools and see how you can use them in your own artwork. Some knowledge of iColorama is necessary to get the most out of this video.

Here’s the resulting image: Neon Neighborhood.

iPhoneography Apps – Using Style>Toon in iColorama

The new Toon feature (January 2022) in iColorama is an AI that sketches your image. It is configured for faces, and has no real user controls. But it can be manipulated to achieve nice results.

Watch the video for some tips.

Mocking an “Acrylic Pour” in iColorama and MetaBrush

I threw together a piece about a week ago that reminded me of one of those “acrylic pour” paintings, where the artist takes what remains of their different colors of acrylic paints and pours them onto a canvas. Swirls can be made by using a small rod or even a comb-like set of rods. The resulting swirls are left to dry.

I called my piece “Tip: Do Not Pour Directly on iPad” – a good bit of advice about any liquid, especially paint.

iCAcrylic_01

I explained that I used both MetaBrush and iColorama to create the image, and was asked which brushes I used. Actually, that’s unimportant. It’s just a technique of swirling in MetaBrush and blending in iColorama. I decided to put together a video that outlines the technique. After watching it, come back and I’ll show you some examples of the kinds of results you could get.

Read more of this post

iPhoneography Apps – Manipulating Sort in iColorama

It’s been a while since I’ve covered any new features in iColorama, the premier mobile art app. The feature I will cover today, Form>Sort, was added a few years ago, and has been used repeatedly in brilliant works by many mobile artists. There aren’t a lot of modifications to the effect that can be accomplished in the Sort command itself, but I’ve discovered that you can make subtler, beautiful effects by modifying the image before applying sort, and I’d like to show you how to do that.

My first image here used Sort on the background, and I added the flower, dog, and painted elements after.

Read more of this post

iPhoneography Apps – iColorama Procedural: Spinning Vinyl

iColorama can do amazing things, with a little patience. I posted the image below in several iColorama Facebook groups, and it got a lot of response, so I’ll show you how to create a 45 RPM single, from scratch, in this great app.

This image used the app Over for text and Leonardo for placement onto a background and adding a shadow. Those tasks can be done in iColorama, but they are easier in other, specialized apps. While I don’t add text in the video, I do show you how to mask the disc onto a new background and create a drop shadow.

Read more of this post

iPhoneography Apps – A return with tips on iColorama’s Text on a Curve

Life does go on, and people still have questions on mobile photo/art apps, so here we are with some tips on the latest feature for iColorama, Txtcurve. In July 2015 I wrote about an app called Path On that places text on a curve, which worked adequately. I am pleased to say that iColorama now gives you the ability to perform the same function within the app. Naturally, Path On has some bells and whistles that are not present within iColorama, but the feature is highly customizable and can deliver some nice results.

Here’s my daughter, a recent college graduate!

I start by creating a Gradient background so you can clearly see the text. Txtcurve is in the Effects submenu, next to Text. At the bottom you will see the word Launch, which opens up a “separate window” which will do the work.

There are two buttons at the top center which bring up separate windows for you to create the Curve and edit the Text. We start in the Curve window, with Paint highlighted at the bottom. I draw across the screen from the top left, then down. The curve is in a bright green.

When I switch to the Text window, the curve is outlined with some “lorem ipsum” boilerplate text. Tapping the Edit button with the keyboard icon at the lower right brings up a keyboard for the entry of text. Unlike the Effects>Text feature, you can paste text, copy it, and edit misspellings and spacing by tapping into the text and correcting it. In the Text feature, you have to backspace through the text to edit it.

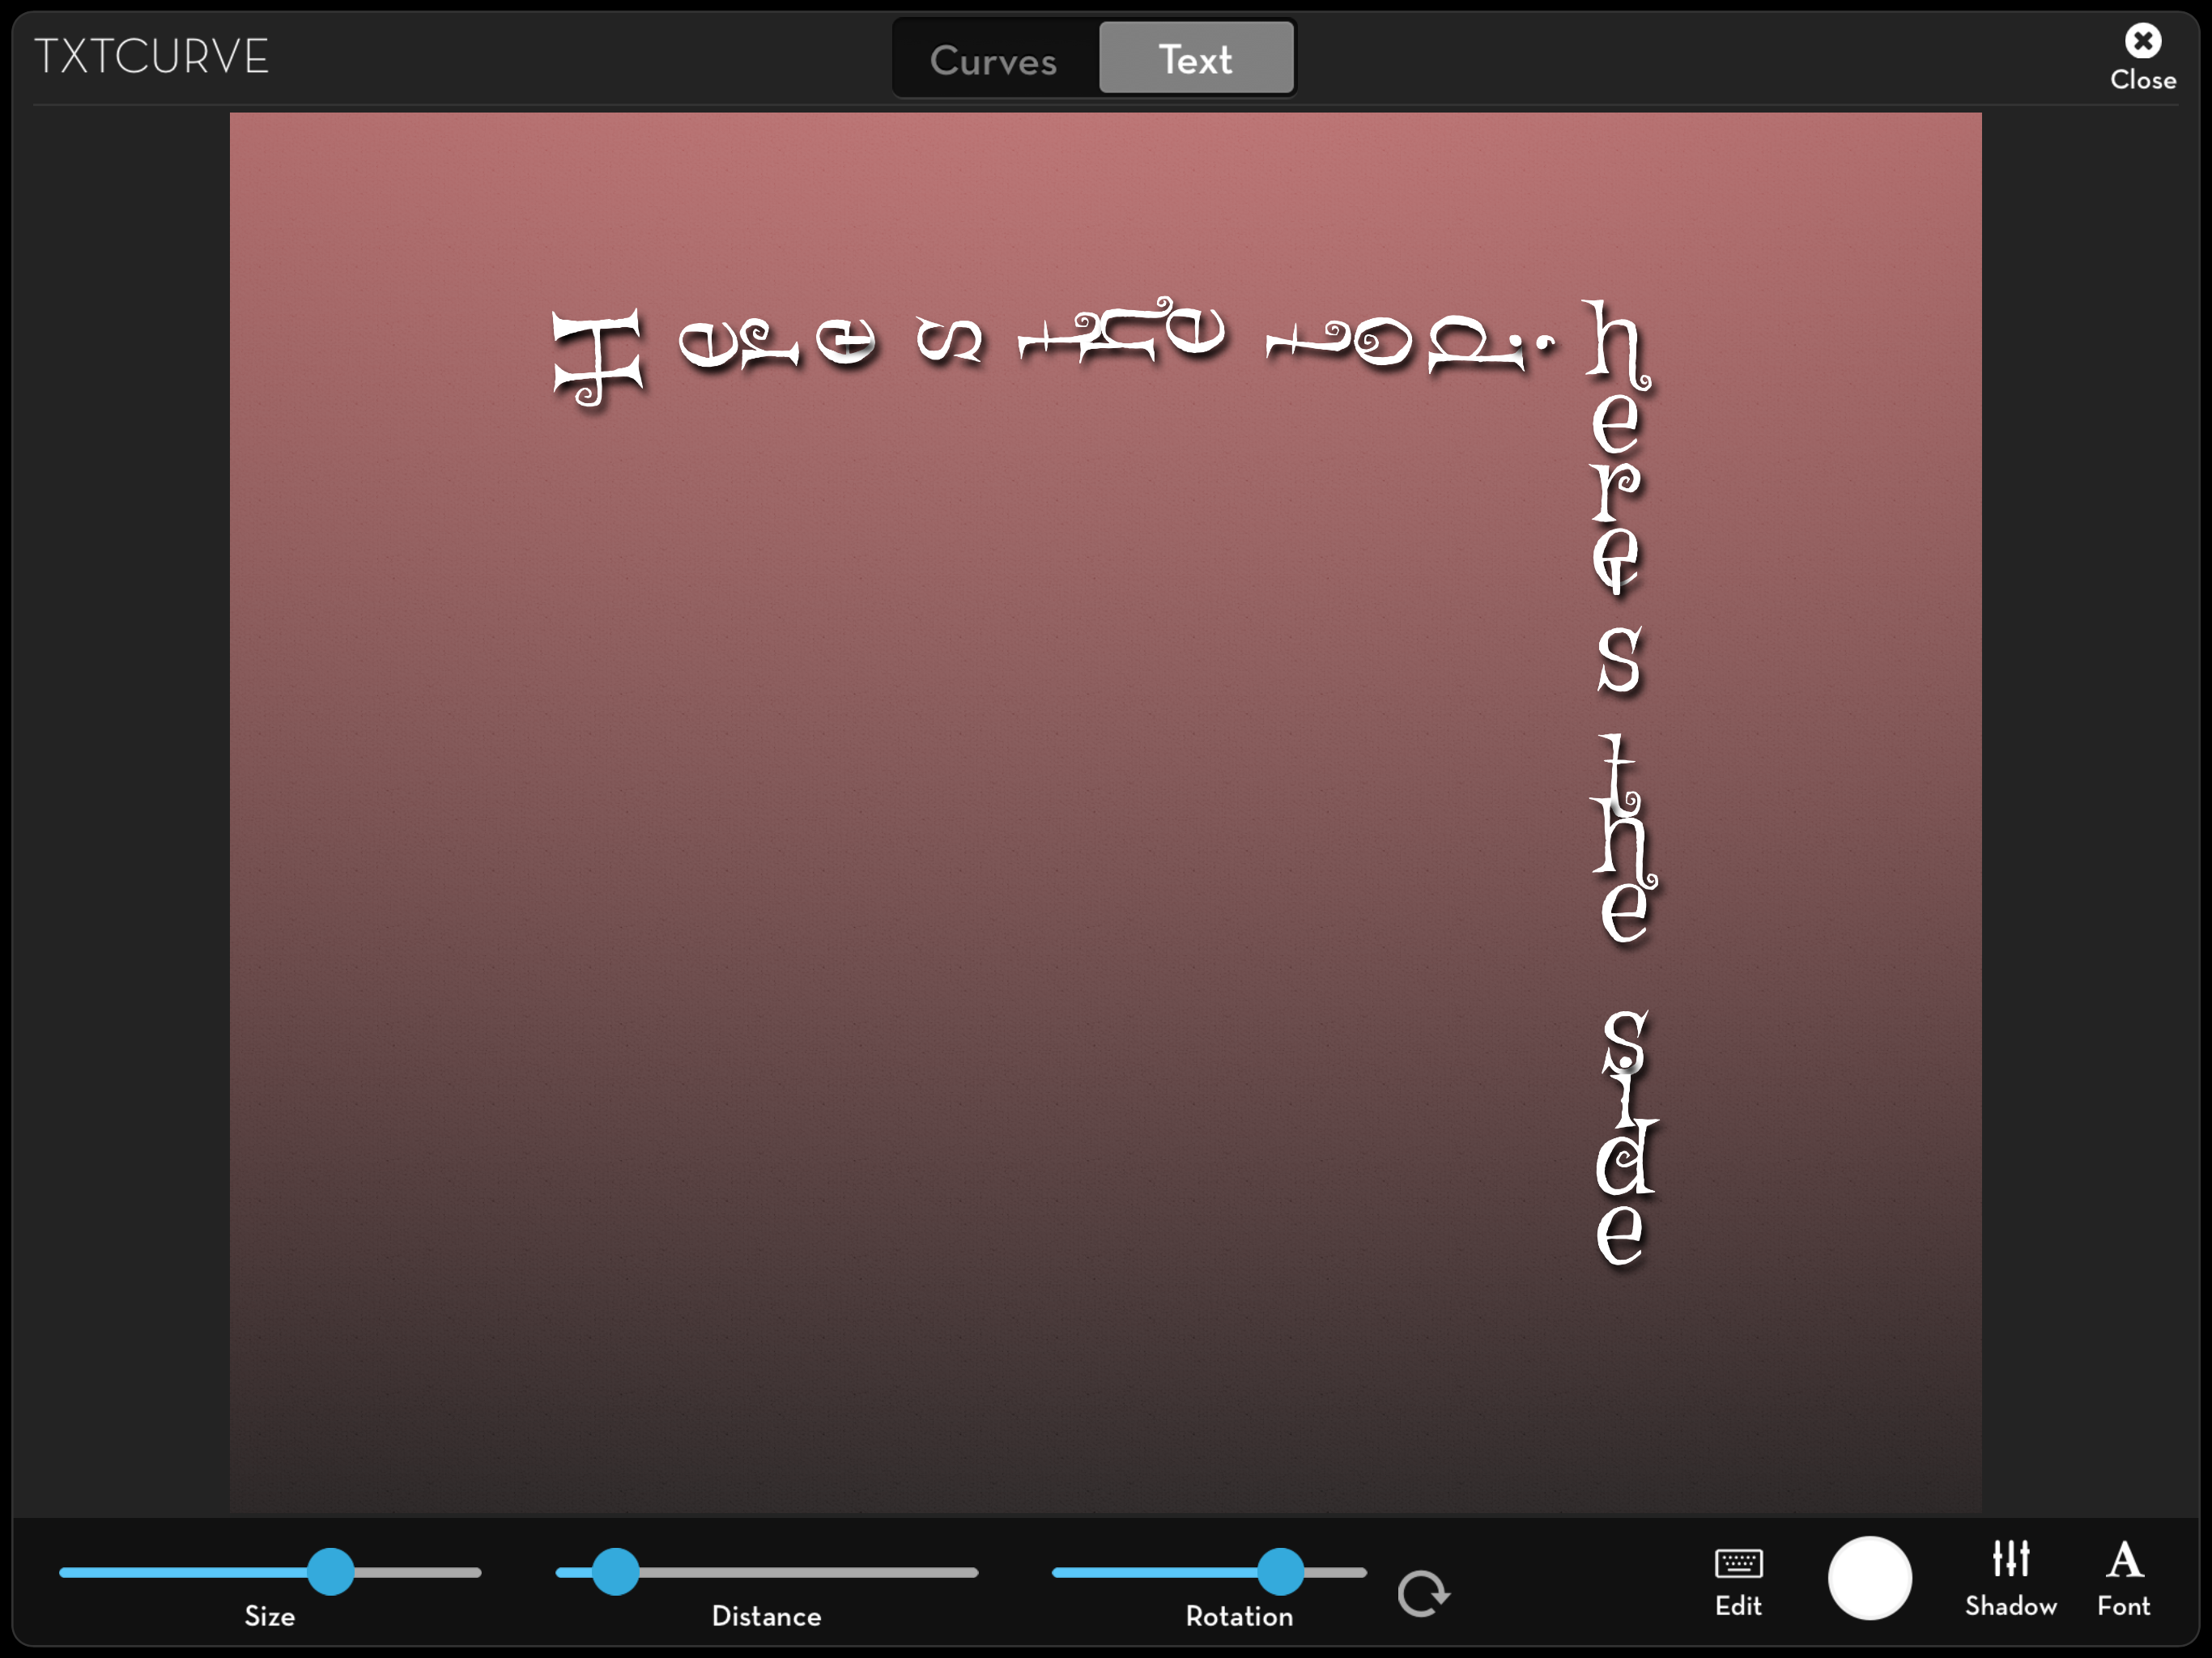
The default text is in a small, fancy font. Below I’ve changed the font and increased the size slider. As I increase the Size or the Distance between characters, the text will slide along the curve. Increase it too much, and the text will “drop off” the end.

Below I increased the Size and the Distance until it broke correctly between “Here’s the top;” and “here’s the side”.

One of the drawbacks of text on a curve is that the curve can affect spacing between letters in a word. A tight curve can bunch letters together until they’re unreadable. There are two approaches to handling the kerning. Path On forces the letters into a rigid spacing, and you can increase or decrease the space overall. iColorama seems to use an automatic type of kerning, in which the software tries to compensate for the vagaries of the particular curve. It the example below, you can see that sometimes the kerning is not particularly good. “Here’s” comes out looking like “H er e’ s”. This automatic kerning is a function of the particular curve, text and font, and it can be hard to predict or adjust.

Below I’ve mitigated the kerning problem by changing fonts. The problem is still there; it’s just not as obvious. I’ve also added a Shadow by changing the Shadow X, Y, and Blur sliders. There is a color picker if you want to change the shadow’s color.

Rotation can come in handy to create vertical text, something that’s not available elsewhere in iColorama. I would want to increase the Distance if I wanted vertical text.
If you’re not happy with the curve, you can change it. Below I switched back to the Curve window and tapped the Transform button at the bottom. I dragged the curve up and to the right with a single finger, and a two-fingered pinch reduced it in size.  You can also rotate the curve with two fingers, which is really nice.

I can also Remove the curve using the trashcan at the bottom and draw in a new curve or curves. When you draw two curves, the text is added to the curves in the order you drew them. I drew the wave at the top before the bowl at the bottom.

When you return to the Text window, the text remains the same. There is no need to re-enter it. Now you can see that the text filled in starting with the wave, followed by the bowl. You can also see that since the curve changed, the kerning problem disappeared.

When you Transform curves, all curves are changed in tandem. It is not possible to change individual curves.

Txtcurve has already been updated, but I had the following screenshots that illustrated a concept I wanted to show that used the unfinished version. That’s why you don’t see the Transform and Curves buttons.

I drew two circles, both starting at the bottom. The one on the left was drawn clockwise, while the one on the right was drawn counter-clockwise. Will that affect the text that uses the circles?

Yes it does! The text follows the direction in which you draw the curves.

iColorama contains some “canned” curves for your use, including hearts, stars, triangles, squares and spirals. There are ten of them available.

Below I used Curve 4/10, a curved star. You can tell by the text that the star was drawn starting at the top right and travelling counter-clockwise.

The spiral was drawn starting in the middle, moving clockwise. It gets pretty crowded at the middle.

By adding some space at the beginning of the text, you can bypass the tight part of the spiral.

When you use iColorama’s Text feature, the text is applied as you leave the Text window. Using Txtcurve, the text has NOT been applied. (Remember to Apply so you don’t lose your work!) Therefore, it is possible to change the Opacity before applying. More importantly, you can mask the text before applying, using either Shape masks, as seen below, or Brush masks. In this way, text can be partially hidden behind mountains, clouds, trees or people.

In the app Path On, text is placed on top of the curve that you draw, just like writing on lined paper. In iColorama, the curve passes through the center of the letters. This can make a difference. Below I drew my curve tightly hugging the outline of my daughter.

When I add the text, it overlaps onto her. It is obvious that the text is centered on the line I drew.

That’s no problem, since I can return to the Curve screen, tap Transform, and drag the curve away from her. It gives me the image that I posted at the top of the article.

If you have need for text on a curve – and you may be surprised at what a nice thing it is – then try out the new Txtcurve feature in iColorama. Here’s an image I created with using the Clone Brush on a Gradient background. The text is from a haiku by a poet that calls themselves Broken Wings.

Until next time, enjoy!


iPhoneography Apps – Four years of tutorials; iColorama basic photo enhancement

Well, another year has gone by. Four years ago, the day after the last US presidential elections, I started posting tutorials on iPhoneography apps. A lot has changed in those four years. I’ve covered over 150 apps, and learned a lot about how to manipulate images on your iPhone or iPad. Some consider me an expert, but all I really want to do is to make sure the average person who finds a love for digital artistry can use the tools they pick up, and perhaps let them know which tools to pick up in the first place.

If you’re interested in which 37 apps I covered in the last year, I will list them at the end of this article. But for now, let’s move forward!

Last week I covered Microsoft Selfie, an app that does noise reduction and skin smoothing on the fly on those selfies you grab. I was going to turn to Microsoft Pix, which does the same sort of thing for images you capture with the back camera. However, it’s a little more complicated than it should be and the results are mediocre. Also, it does not capture at full resolution. Quite frankly, I am getting tired of these kinds of apps that tout themselves as quick and wonderful and yet deliver below-par results. We deserve better. The technology is there, but the instant profit is not, so we get stuck with low-res images from a huge company like Microsoft.

Can I get results as good with apps I already have? Well, sure. I can even do more, in just a couple of minutes, using an app like iColorama. In order to prove that I could get good results through iColorama using a low-res original, I took a shot with the front camera on my iPad. These cameras are known for not producing very nice images, and this one had a lot of noise and blockiness. Nevertheless, I wasn’t happy with the after image since it wasn’t that good an image to start with. The lower the resolution, and the more noise you have, the less likely you are to recover dark areas, such as the ones surrounding my eyes.

ic26_01

Read more of this post

iPhoneography Apps – Coming to Terms with Brushes using PaintHack and iColorama

Any time you try to learn a new skill, the first roadblock you encounter is the specialized terms associated with that skill. How are you going to play American football without knowing what a touchdown, punt or offsides penalty is? How are you going to operate a computer without knowing the difference between an icon and an operating system?

Art apps use a lot of terminology borrowed from physical painting with brushes and pencils, charcoals and pastels. However, since you are not actually using these physical tools, but a finger or stylus, then the app has ways to control the output of touching the screen to mimic the physical action. These brush controls are named in similar ways across most art apps.

In order to explain what some of these controls actually do, I am going to be using two apps: PaintHack and iColorama. PaintHack uses a brush engine similar to the one in Procreate, which is commonly seen as the industry standard among art apps. It undeniably gives you the most control over your software brushes. iColorama adds a control that also comes in handy for artists and is not an option in PaintHack or Procreate. It’s used in the example below; can you guess what it is?

brushterms_01

Read more of this post

iPhoneography Apps – iColorama Procedural: Studies of a Brush Tip

I created a piece in iColorama the other day that used a variety of techniques. It started simply – just a background and a single dab with a brush tip on a mask. These kinds of works, the ones that use variations on a single theme, are valuable to teach these multiple techniques. So here’s a 10-minute lesson on how I came up with this work, which I entitled “Studies of a Brush Tip”.

iCv25_01

I apologize for the fact I had to speak so rapidly to get everything in, but I cover a lot in these ten minutes. Nevertheless, you should be able to follow along as long as you pause frequently.

.

Here’s the end result of the video.

iCv25_02

Until next time, enjoy!

iPhoneography Apps – iColorama: Brush Tips #2

Last time I went over the Colorize brushes, which (for the most part) use assigned colors to paint. I even showed you how to paint with a photo as your brush tip. This time we will take a look at brush types that sample the color underneath them, allowing you to paint photographs. I’ve featured these brush types many times, in discussions on Artist, Rebound, Plane, Clone, Stamped, Edged and Raised brushes. The tip I’ll be sharing is not the operation of these brush types, but a workflow you may not be using that has multiple advantages.

The standard workflow is to load an image, then select one of the types from the brush menu. A white “canvas” overlays your image, and you can use the Background button to change that canvas to another color or an image you have saved that’s appropriate for a canvas. Any brushstrokes you make pull the initial image through the canvas, in the style of that brush type.

This works fine, and many iColorama artists use this method to create fine artworks. But what happens if you want to change the canvas? Make changes to the underlying image because the painting is coming out too muddy? Add another element to your painting? Perhaps more important: what if you are interrupted and want to pick up your painting again later? This workflow I’m describing will solve these issues.

The first thing you have to do is get out of the habit of loading an image and beginning to paint. You have to make preparations. First, just as you would with oils, acrylics, markers, ink, watercolors or charcoal, you have to prepare your surface. Have your canvas created and saved so it is easy to return to. I start with an image the correct proportions for my painting and overlay it with Preset>Gradient.

iC24_01

Read more of this post